In the beginning, Ir. SL Mak (OUHK) gave an opening remark and introduced guest speakers to us.
The first speaker was Mr. Chan Tak-kin (Senior Electrical & Mechanical Engineer, SCL) and his presentation topic was "Balance Calibration". Mr. Chan introduced 9 International System of Units (SI) such as meter (m), kilogram (kg), second (s), ampere (A), kelvin (K), mole (mol) and candela (cd).
The Mr. Chan introduced the mass of the international prototype of the kilogram (IPK) which defined at the 1st General Conference on Weights and Measures since 1889. IPK is a cylinder of 39mm in height and diameter, made of an alloy consisting of 90% platinum and 10% iridium (Pt-Ir) with a density of about 21,500 kg/m3 (where stainless stainless density is about 8000 kg/m3). IPK is being kept at Bureau International des Poids et Measures (BIPM) in France.
For practical, the weighs are usually manufactured of stainless steel which less density than Pt-Ir alloy. It was required two main correction included air buoyancy (~100 mg for 1kg) and gravitational configuration effect. The following diagram demonstrated how to correct the air buoyancy.
Weight classification schemes usually followed OIML R111, or ASTM E-617 or NIST 105-1. It separated into classes E1, E2, F1, F2, M1, M2 to M3 (where E = Extra fine accuracy; F = Fine accuracy; and M = Medium accuracy). Physical and metrological characteristics included dimensions, shape, material, surface quality, nominal value, density, magnetic properties, maximum permissible error, construction and presentation. The following table showed the maximum permissible error. Moreover, classes E1 to F2 weights should not be handled with bare hands.
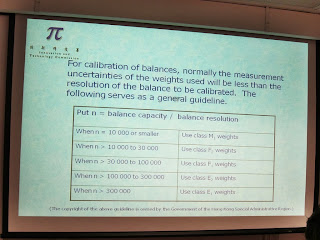
The balance location should be free from air movement, effects of heat source, machinery, electric and electromagnetic interferences, as well as, disturbance. Factors to be considered for balance selection included (i) Capacity (Max & Min mass to be weight) and (ii) Accuracy required (Resolution is usually 1/10 of the required accuracy). The following table used for calibration of balance based on balance capacity and resolution. (e.g. 6.1kg capacity and 0.1g resolution that n = 61000, where using class F1 weights are appropriated.)
Finally, Mr. Chan discussed the calibration of a balance based on (i) Repeatability, (ii) Linearity of scale and (iii) Eccentric loading. He said discussed how to interpret the data from calibration certificate included Limit of Performance (L).
The second speaker was Dr. Francis Seung-yin Wong (Electrical & Mechanical Engineer (Length), SCL) and his topic named "Calibration of Precision Balls". Firstly, Dr. Wong introduced the precision balls measurement included the size of a deep bore, angle of an internal taper, parallelism of the measuring faces of a micrometer, and essential components of critical engineering parts.
The following diagram showed the measurement for size of a long bore.
The tools for determining the angle of a typical Morse taper drill sleeve using precision balls were discussed.
Then the assessment of the parallelism of the measuring facess of a deadweight micrometer using a steel ball was introduced. There were 5 locations for this measurement included front, back, left, right and center.
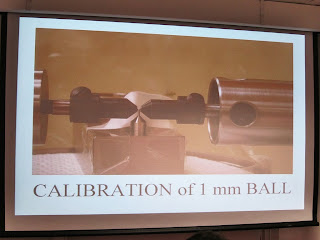
After that Dr. Wong mentioned how to calibrate the precision balls (in different diameter) using Universal Measuring Machine (UMM). Its measuring Head range is from 0 to 100mm with resolution up to 0.1um and accuracy is 1um. However, it needs to use special developed handling fixture to hold the precision ball for measurement. (See diagrams below)
During the measurement (example 1mm ball), the fixture used soft material to cover the surface area in order to avoid any damage of precision ball during collision.
Finally, Dr. Wong explained its uncertainty estimation and model.
At the end, IEEE-PSES presented a souvenir to both speakers.
Reference:
OUHK: http://www.ouhk.edu.hk/WCM/?FUELAP_TEMPLATENAME=tcSingPage&lang=eng
IEEE-PSES (HK Chapter) - http://www.ee.cityu.edu.hk/~emc/pse/
InstMC-HK - http://www.instmc.org.hk/
HKIE - Control, Automation & Instrumentation Division - http://ca.hkie.org.hk/


沒有留言:
發佈留言